Making art is fun any time of the year! However, during holidays it’s especially fun because kids have some parameters to work within to help them decide what to create (sometimes that is the hardest part about art). For Halloween, kids get to work with shapes/symbols like ghosts, bats and cats while they explore colors such as orange, black and purple.
Here I have compiled (in detail) 10 Fun and Easy Halloween Art Lessons for Kids. You’ll have enough ideas here to keep you busy for years to come…so pin this article so you can refer back to it whenever you need to!
1.Exploring Halloween Shapes & Symbols using Magazine Strips
Materials: magazine strips, glue, scissors, construction paper and FREE Halloween templates (click HERE).
Download the silhouette outlines of the Halloween symbols HERE. Cut out the templates and have the kids use them to trace onto thick construction paper (the kids can pass the templates around the room when they are done).
Then, depending on the age of your students you can either have them cut long strips of magazine pages OR you can pre-cut them and have them set out on the table for the start of this project. I like to pre-cut because I have a paper cutter and it’s much faster (and straighter) if I do it. The kids take a looonnnggg time when they look through the magazines because they get…ya know…distracted!![Halloween art project with magazines]()
Students should then cut the magazine strips to fit into the Halloween shape they traced. They can play with the direction and texture as they place the strips within their Halloween shape.This is great for fine motor development. Students will enjoy looking through the box of magazine strips for various colors and little pictures they recognize. Once the shape is completely filled with magazine strips, the kids can then cut it out and and this will “trim” the edge that didn’t line up perfectly. Then glue the final work to adifferent colors of construction paper and hang up for display. The final artwork will be full of texture, color and lines! ![halloween art project with magazine strips]()
2. Pumpkins with Tissue Paper
Materials: tissue paper, orange crayon, glue, scissors, paint brushes, permanent marker, construction paper and FREE Pumpkin template (click HERE).
I like to use the technique in this lesson for all kinds of other projects–it’s a nice “trick” to have up your sleeve as a teacher. I love the way different warm colors of tissue paper like orange, yellow and red make new interesting shades of color. The final pumpkins are rich with color and texture. Kids get to work on cutting and gluing while strengthening their motor skills. Again, depending on your students either pre-cut the tissue paper, have them cut it our even let them tear pieces from larger pieces of tissue paper (whatever works best for your situations). ![construction paper pumpkins]()
1. Have students trace a pumpkin template onto a piece of construction paper and outline with a thick black marker (it needs to be a permanent marker or it will bleed when it gets wet from the glue). Download the free template HERE if you didn’t already.
2. Color the entire pumpkin with an orange crayon.
3. Put a few drops of glue down onto the pumpkin and then add the pieces of tissue paper. Cover the entire pumpkin and go over the edges with the tissue paper. Be sure to let pieces overlap so you create new shades of yellow, orange and red.
4. Put glue all over the top of the tissue papered pumpkin and “paint” the glue on the top to create a consistent layer all over the pumpkin–this is sort of like using modge-podge.
Here are the steps visually for you to see…
![tissue paper pumpkin]()
5. Once the tissue paper and glue is dry then cut out along the outline of the pumpkin to reveal the final artwork. I like to glue to black backgrounds to get a strong contrast!![tissue paper pumpkin]()
3. Interactive Halloween Coloring Sheets
Materials: Crayons, colored pencils or markers, interactive coloring sheets view HERE.
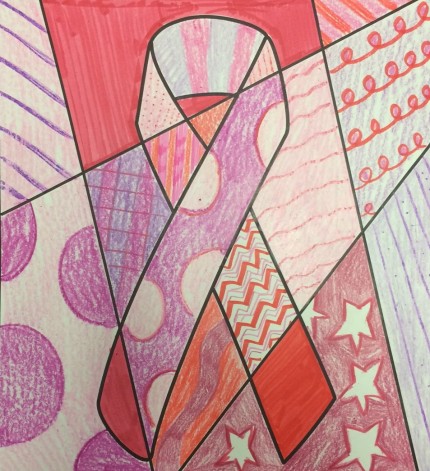
I have had an interest in Pop Art all of my adult artist life. I created interactive Pop Art style coloring sheets to provide students with the opportunity to try their own hand and learn about Pop Art images themselves. The great part about these coloring sheets is that no two will ever be the same. There is an endless number of combinations students can create with these coloring sheets. There are writing prompts also included with these sheets as well to help align them to the common core and provide students more time to practice writing.
These interactive coloring sheets are one of my most popular items in my Teachers Pay Teachers store. Here is what one of my Instagram teacher friends says about my interactive coloring sheets…
” I found that my 5th/6th graders come to me and because of the focus on testing, never played with color or design or patterns. Your products give them that opportunity and I’ve seen so much improvement in their attention to detail as well as noticing patterns, lines, etc. It’s so much more than “just coloring.”
![pop art coloring interactive coloring]()
To get these coloring sheets to use in your classroom click HERE.
4.”Create a Creature” Group Project
Materials: 8.5″ x 11″ paper, pencils, crayons/markers/pencils, and Handouts download FREE lesson HERE
This lesson is an adaptation from the popular Exquisite Corpse game made popular by Surrealist artists like Salvador Dali. I for one, don’t like using that name with students so I’ve always done my own version called, “Create a Creature.” I’ve made an easy handout and directions so you can use this lesson as an “I’m done” activity, with a sub, or with your entire class. There is also a writing prompt included to give students more time to practice developing their writing skills. Your kids are going to L-A-U-G-H with this project!!! It’s a great group project.
Get your FREE handouts and directions to this lesson HERE.
![exquisite corpse]()
5. Monster Matching and Memory Game
Materials: colored ink and printer, copy paper, laminator, scissors, envelopes.
While we are talking about group activities like the “Create a Creature,” let me share with you these fun monster games. I love having centers in my room so I can work individually with other groups of kids on clay and harder painting projects, so I like to have games like this one available in my room. Classroom teachers could use this center for when they need to individually conference with students. For this lesson you, the teacher will print out and laminate the pieces to the game and then put all the pieces in large envelopes (all directions are included).
Both of these games are ones your students will recognize – matching and memory games. I’ve just made them fun for Halloween by making the games with monster images. You can get them HERE.
![monster game]()
6. Haunted House with Milk Cartons
Materials: empty milk cartons, construction paper, scissors, glue, masking tape. ![milk carton haunted house recycle]()
Have you ever been in the lunch room at the end of lunch to witness all the milk cartons that get thrown away (or maybe recycled)?
One year I decided that we should make little haunted houses with those empty milk cartons. Luckily I have a super cool custodian and he was kind enough to save the milk cartons for me. He even rinsed them out–what a guy!
To start this project I opened up all the tops of the milk cartons and rinsed them one more time.
Originally, I thought each kid would make a haunted house using one milk carton (like the house on the right up above), but you know how kids are–they have WAY better ideas then I ever do. They of course, wanted to build multi-level haunted houses. I had a TON of milk cartons so that was a great idea! Students started building and designing their haunted house however they wanted to. They used masking tape to hold everything together as they were designing.![haunted house with milk cartons]()
Once they had their house designed then they started covering their milk cartons–er, I mean haunted houses, with paper. I didn’t require them to do this any particular way, I was more interested in letting them “solve” the problem of how to cover the house. Not all kids were successful in creating a “perfect” haunted house–but so what, it’s a haunted house! I wanted them to think for themselves and not rely on me to tell them exactly how to cover their house. I also hoped they would work together to figure out the best way…many kids did!
Some students measured the house and measured paper and glued it on. Some wrapped the house in paper…all kids solved it their own way–perfect!
Once the house was covered then students added details like windows and doors from scrap construction paper. Students were completely engaged in this project and truly enjoyed taking something they use everyday, like their milk carton, and transforming it into something completely new. That’s the beauty of art!
7. Haunted House with Brown Paper Bags
Materials: brown paper bags, mix of colored construction paper, scissors, glue, shredded paper, markers, crayons and pencils.
![brown bag haunted house]()
My second grade students love how easy and fun this project is. Each student got one brown paper bag and was asked to design a haunted house. I provided students with an assortment of construction paper and very little “how-to” so they would dream up their designs (just like on the milk carton haunted houses). First students designed the front of their bag and then I showed them how to flip the bag over and fold the flap so they could design the back of the house (if you don’t show them they’ll draw on the flat, which later becomes the bottom of the house). Once windows and doors were glued on and any other decorations were added then we opened the bag and filled them with shredded paper. An easy place to get shredded paper is from your front office. They often shred materials and have more shredded paper then they know what to do with. You might give them a little heads up that you’d like them to save you the next bag of shredding. Use a piece of construction paper and staple it to the top to create the roof and to seal the bag. ![brown bag haunted house halloween]()
The kids loved the playfulness of this projects and so did I. However, the best part had to be the end when we lined up all the houses on the floor to see. I was amazed at the way the kids would sit by them and look at them. I felt like I was standing at an art gallery watching the people “experience” the art. My second graders would just come, sit down and “look” at all the work and notice all the fine details kids came up with! ![halloween haunted house brown bags]()
![haunted house brown bags halloween]()
Variation: If students needed trick-or-treat bags you could leave off the roof and leave out the paper shredding and add strings to the bag so they could use them on Halloween to receive their goodies.
8![Halloween door poster]() . Haunted House Classroom Mosaic Door Poster
. Haunted House Classroom Mosaic Door Poster
Materials: haunted house mosaic door poster (click HERE), copy paper, colored pencils, markers or crayons and tape.
I wanted to design something that would make your life as the teacher really easy for Halloween. I know teachers love the “idea” of decorating their doors for holidays but the thought of actually coming up with an idea, gathering the supplies and then making the door often gets marked off the “to-do” list before it’s created or just never even makes it on the list. This project is very easy for the teacher and allows all the kids in your class to be involved. There are two variations to this poster (making for even more easy options). The first, foremost and MOST easy is to just print the colored pieces of the poster, have your students cut them out, put it all together, and hang it up! Easy-peazy-lemon-squeezy!!! Here are a few pictures of what the door looks like if you like this option (or are crunched for time). This poster is a product available in my Teacher Pay Teachers store
![hallloween door poster haunted house]()
The second, and funner, version is to have the kids color the poster themselves. This makes for a great classroom cooperative activity. In this variation of the door poster students (also included in my TPT product packet), the kids will color the pieces, cut them out and add their faces to the windows (this makes it extra fun) and then put the poster together and hang it up! There are 30 places to add kid faces but if you don’t have that many students (hallelujah !!!) then just have the kids color the blank windows yellow. Take a look at this detail…![haunted house door poster]()
With both posters I’ve left room for kick plates at the bottom of your door and soft close hinges at the top. If you want the entire door to be covered, I recommend using butcher paper to cover the entire door and then add the poster to the paper. Once the poster is up simply cut around the door knob and be the envy of your hallway! Here are some “action shots” of the coloring version of the poster…![haunted house door poster]()
click HERE to view this poster in my store.
9. Pumpkin Pinch Pots
Materials: kiln dry clay or air dry clay, orange paint (or glaze) and various clay tools.
![clay pumpkin pinch pots]() Pinch pots are the easiest of all the clay projects. You simply take a ball of clay and then “pinch it” to make an opening. This technique can be done with kids during Halloween to make small little pumpkins. This can be done by classroom teachers using air dry clay or by art teachers using kiln fire clay–or best of both worlds, classroom teachers and art teachers can collaborate to make these cute little pumpkins!
Pinch pots are the easiest of all the clay projects. You simply take a ball of clay and then “pinch it” to make an opening. This technique can be done with kids during Halloween to make small little pumpkins. This can be done by classroom teachers using air dry clay or by art teachers using kiln fire clay–or best of both worlds, classroom teachers and art teachers can collaborate to make these cute little pumpkins!
1. Roll a ball of clay and then take off about 1/3 of it. Roll both portions of clay into balls. Then with the larger ball (this will be the base of the pumpkin) put your two thumbs on the top of the clay and then push your thumbs into the clay thereby “pinching” the clay between your thumb and fingers on both hands. Use your fingers to work the clay into the right size and opening you would like.
2. Use the 1/3 of the clay that you set aside for the top. You can do one of two things. Either create a top that is flat with a stem coming from it, or create a smaller pinch pot that fits onto the bottom of the pumpkin. Play with both shapes to be sure the match and fit together. ![clay pumpkins]()
3. Add details and texture to the pumpkin. Using a skewer you can etch lines into the clay and you can even create eyes, nose and mouth if you are more interested in a jack-o-lantern design. . If you are using kiln fire clay you will want to let the the top and bottom dry separately so the two pieces don’t get stuck together). Make sure kid have put their initials on the bottom of both pieces. I love seeing an entire classroom set of clay pieces like this…![clay pumpkins]()
4. Fire the kiln fire clay (after letting the pieces dry to leather hard) or let the air dry clay dry per instructions on the container.
5.![pointed stilts]() Next, decorate the pumpkins using either acrylic paint for both kiln dry and air dry clay–or if you have access to beautiful glazes, then go that route. If you don’t have little pointed stilts for the glazed pieces you’ll need to keep the bottom free of glaze or else they will stick to the kiln shelf. I recommend you use pointed stilts so you can glaze the pieces on all sides. They are pictured to the left. Simply place them in your kiln with the clay piece on top and then when they are fired the clay pumpkins will pop right off of the metal stilts.
Next, decorate the pumpkins using either acrylic paint for both kiln dry and air dry clay–or if you have access to beautiful glazes, then go that route. If you don’t have little pointed stilts for the glazed pieces you’ll need to keep the bottom free of glaze or else they will stick to the kiln shelf. I recommend you use pointed stilts so you can glaze the pieces on all sides. They are pictured to the left. Simply place them in your kiln with the clay piece on top and then when they are fired the clay pumpkins will pop right off of the metal stilts. ![halloween blog post pictures.016-001]()
The finished products are stunning…![clay pumpkins]()
These directions are not intended to be a complete detailed description of how to use kiln fire clay, so if you have any questions don’t hesitate to e-mail me and ask!
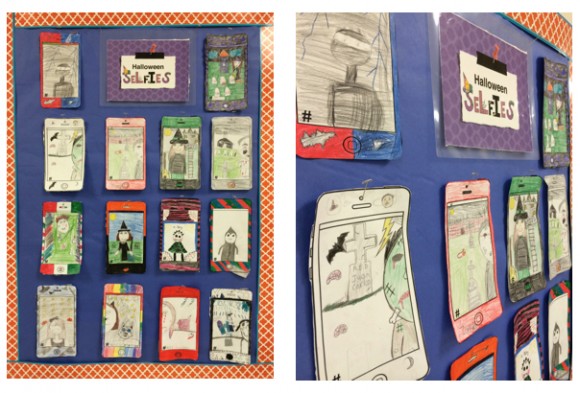
1![halloween selfie self portrait drawing activity]() 0. Student “Selfies” in Costume
0. Student “Selfies” in Costume
Materials: Halloween selfie handouts (click HERE), crayons, markers or colored pencils, scissors and pencils.
Kids love selfies, teachers love selfies, everyone loves selfies these days (or so it seems). In art we’ve been in love with selfies for years and years, we just always call them “self-portraits.” I set out to teach my students about self-portraits with the popular buzz word “selfie” and what better time to play with this idea than Halloween?! Kids draw a self-portrait as if they were dressed in their Halloween costume. Kids have so much fun making up these pictures. When these cute little drawings are finished they make a really good bulletin board display. The product for this is one I created for my Teachers Pay Teachers store and it also comes with a PowerPoint slide set that features famous artist self portraits on smart phones as well as text message writing prompts. You can check it out here to see it in more detail. ![halloween selfie]()
![selfies in halloween costume]()
Whew! That’s it! If you made it this far, thank you!! I hope you found lots of “treats” to get you through the next month. See you in November for a collection of Thanksgiving/fall ideas!![picture and name logo.001-001]()


 THESE ARE A FEW OF MY FAVORITE THINGS…My daughter, my daughter, my daughter…OH you want other things? I love my mac computer, pickles, peanut m&m’s, any and all art materials and my dance shoes!


 .
.


 . Haunted House Classroom Mosaic Door Poster


 Pinch pots are the easiest of all the clay projects. You simply take a ball of clay and then “pinch it” to make an opening. This technique can be done with kids during Halloween to make small little pumpkins. This can be done by classroom teachers using air dry clay or by art teachers using kiln fire clay–or best of both worlds, classroom teachers and art teachers can collaborate to make these cute little pumpkins!

 Next, decorate the pumpkins using either acrylic paint for both kiln dry and air dry clay–or if you have access to beautiful glazes, then go that route. If you don’t have little pointed stilts for the glazed pieces you’ll need to keep the bottom free of glaze or else they will stick to the kiln shelf. I recommend you use pointed stilts so you can glaze the pieces on all sides. They are pictured to the left. Simply place them in your kiln with the clay piece on top and then when they are fired the clay pumpkins will pop right off of the metal stilts.

 0. Student “Selfies” in Costume


 I did these ice cream cones with 3rd graders and they looked amazing, can you imagine how great these would be with middle school and high school students??? (If you do them please tag me on Instagram (@artwithjennyk) or send me an e-mail because I’d love to see this done with older students too). This variation can be done with any of my


 . Recipe: Pop Art Sugar Cookies
 I hope you’ve gotten a lot of great ideas for Halloween and maybe you’ll even try those pop art cookies (if you do, tag me (@artwithjennyk) on Instagram b/c I want to see them!). Now please be sure you’ve stopped by The Teaching 2 Step to enter and win one of the three prize packs we have put together from generous donations and check out all the blogs that are linked to our blog hop for TONS of freebies, tips, recipes and more… Click


 The consistency was great and even though our hands looked terrible they smelled great!

 Erin Cobb from


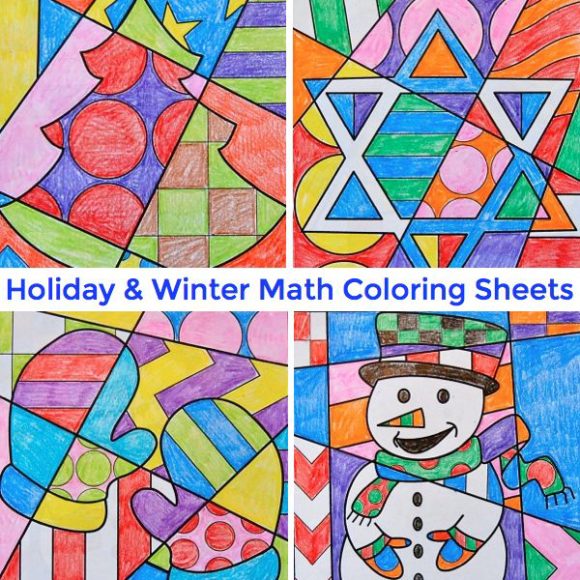
 I like to use the arts to help my students with their academic success as often as I can in my art class. I feel like I’m contributing to my school community this way. We read, write and do math whenever it’s applicable. For a long time I’ve wanted to make my interactive coloring sheets into math coloring sheets, but one fun idea after the next kept bumping the math sheets down the “to-do” list. This month, finally, I did it! I used them with my students and they loved them. I couldn’t believe when I told them we were going to do math with our art that they actually cheered! (I sort of snickered and thought to myself “did they really just cheer when I told them we were going to do math” –go me– or go classroom teachers I should say!).


 A few months ago, I saw that you could submit to guest write for Rachel Lynette on her amazing blog, Minds in Bloom. So, of course, I submitted a proposal to blog about art integration for classroom teachers…since that is my focus with the resources I develop for


 However, for the next group of kids (4th grade) I was more prepared. When they entered the class, the large Olaf was still on my board and the kids all started screaming (really they did) with excitement that we were doing something with Olaf. Just for fun I asked them if they would “like” to do an Olaf drawing. You know the response! Being a bit more prepared, I gave the kids a light blue paper and some white crayons (I keep my white crayons and pencils separate from all the rest).
 I talked to the kids about the shadows on the body of Olaf and how he’s not just white. We talked about how the kids could use some blue and purple as reflections to help make him look more 3D. Kids drew him with pencil, outlined him with black Sharpie markers and then colored him in with white crayons. Using other colors and designs, they added the background. Most kids still need another week to work, but here are some of my early finishers:


 Well, Olaf certainly wasn’t on the agenda for my lessons this month, but it just goes to show why it’s so important to be flexible and to listen to your students. They had so much fun and truly embraced their artwork. Plus, it inspired me to do some snowman activities with my daughter. So, for all that, I’m glad Olaf came and hijacked things for a day or so!


