Art integration is the best “tool” for any teacher to have. Especially when you are trying to incorporate project based learning (PBL) activities. PBL is considered an alternative to paper-based, rote memorization, teacher-led classrooms. John Dewey is credited with the idea of “learning by doing.” I have many PBL lessons such as my Salvador Dali Telling Time lesson, my Brown Bag Art Challenge and my Selfie Lesson but one of my most popular is my Quadrilateral Robots.
Quadrilateral ![robots for blog post.005-001]()
To see my full resource in my TPT store click HERE.
Common Core Standards
3rd grade: CCSS.Math.Content.3.G.A.1 Understand that shapes in different categories (e.g., rhombuses, rectangles, and others) may share attributes (e.g., having four sides), and that the shared attributes can define a larger category (e.g., quadrilaterals). Recognize rhombuses, rectangles, and squares as examples of quadrilaterals, and draw examples of quadrilaterals that do not belong to any of these subcategories.
4th grade: CCSS.Math.Content.4.G.A.2 Classify two-dimensional figures based on the presence or absence of parallel or perpendicular lines, or the presence or absence of angles of a specified size. Recognize right triangles as a category, and identify right triangles.
5th grade: CCSS.Math.Content.5.G.B.3 Understand that attributes belonging to a category of two-dimensional figures also belong to all subcategories of that category. For example, all rectangles have four right angles and squares are rectangles, so all squares have four right angles.
5th grade: CCSS.Math.Content.5.G.B.4 Classify two-dimensional figures in a hierarchy based on properties.
![Quadrilateral definition image for blog.002-001]()
Math + Art = FUN! Learn about quadrilaterals while designing and constructing a robot. Show students an example of a robot made up of only quadrilateral shapes. Instruct students that they are to create their robot using ONLY the quadrilateral shapes of squares, rectangles, rhombuses, parallelograms, trapezoids and kites. Encourage students to use their imaginations to create a robot of their own design!
![Screen Shot 2014-09-03 at 10.46.03 PM]()
STEPS:
Step #1: Teach students what quadrilaterals are. Click here for a free handout.
Step #2: Draw each quadrilateral shape on the board; square, rectangle, trapezoid, rhombus, parallelogram and kite. Instruct students that they will be making a robot using only these shapes. Encourage them to use their imaginations to create their robots.
Step #3: Give students a 12” x 18” sheet of black paper and a variety of colored construction paper. You can choose a color scheme or just let the kids pick!
Step #4: Give students scissors and have them cut out quadrilateral shapes for the body, head, arms, & legs using the primary colored construction paper (students should not glue yet). Some students like to use a pencil at this step and first draw the shape before they cut it out. Other students like to cut without drawing first. Let the artists decide how they would like to solve this. Encourage student to describe the quadrilateral shapes they are making to one another
![quadrilateral images for blog post.001-001]()
Step #5: Have students cut out smaller details for the robot, such as the eyes, mouth, hands, feet and other smaller shapes. Remind students that they are using only quadrilateral shapes.
Step #6: Once students have cut out and roughly assembled all of the pieces on the black paper give them glue sticks so they can begin gluing down each piece.
Voila! Your finished work will be a fun, creative and colorful quadrilateral robot. Not only will students have a lot of fun dreaming up their Robot but they will also become familiar with all types of Quadrilaterals in a very fun and easy way!
Here are some of the finished Robots.
![IMG_4571]()
![DSC_3644]()
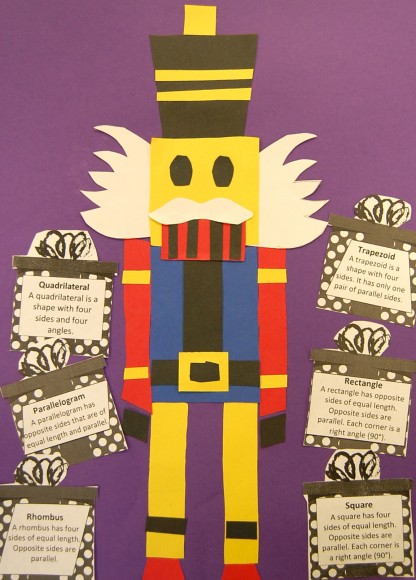
This lesson was so fun I even created a holiday version: Quadrilateral Nutcracker
![DSC_3825]()
![DSC_3357]()
Project based learning is about “in-depth inquiry.” In order to expand this lesson to see if students gained a deep understanding about quadrilaterals I created a game called “Robot Road” and students use their knowledge of quadrilaterals and all the subsets to answer higher level thinking questions. Students get to use a paper robot to move along the “road” and discover what quadrilateral is a subset of another. If you are interested in the game and worksheets click here.
![QUAD 3]()
![QUAD 4]()
I thank you for reading my post and I hope you see how helpful art integration can be for PBL. Strive to be a child centered classroom full of project based learning, art integration and art infusion!
Jenny K.


 I’m an artist… I LOVE to draw, color, paint and just create in general. Even when it’s drawing on the computer I’m just as happy. Today I got to have some good-old-fashion drawing fun. I created an interactive coloring sheet set of penguins and I loved every minute of it…I could have created 100 more of these cute little guys. This summer my husband and I took my daughter to Sea World and one of the most amazing things we saw were the penguins. I’m not sure if it’s because it completely took me by surprise or if it’s because I felt like I was actually standing on the ice looking over at them. It was truly a sight to see.


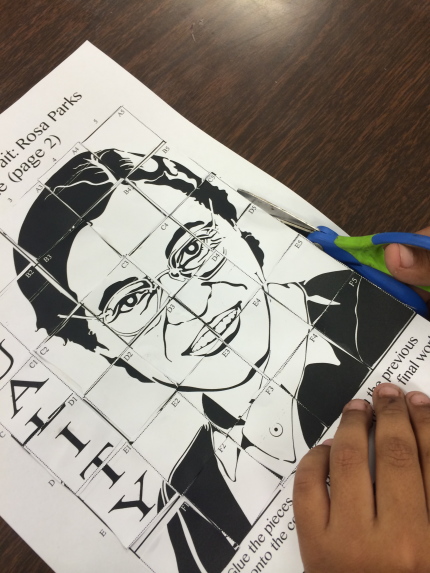
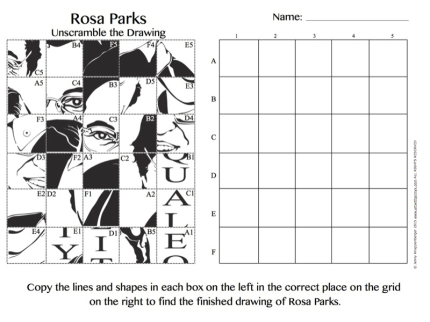
 Say WHAT???? Last week I was having my kindergarten through second grade students use my “unscramble the portrait” portion of my collaborative grid
 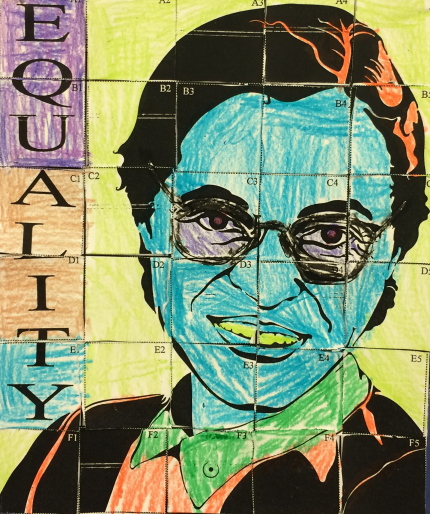 I started to think …wow…what a GREAT idea! Why didn’t I think of that??? Well, the answer to that is easy…because kids are WAY smarter and more creative then I can ever dream of being.

 My older students (grades 3-5) are actually drawing Rosa Parks and they are as jelous as can be that the “little kids”
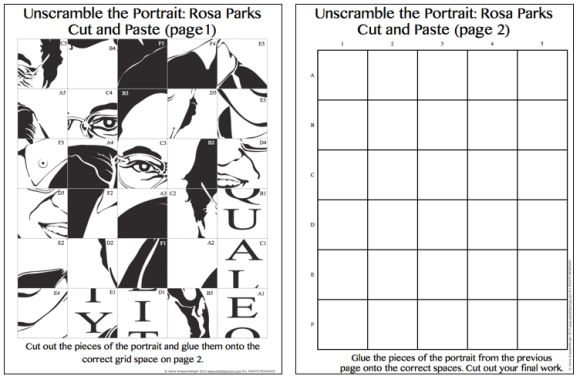


 They will cut one side of the monster and then pin that to their second piece of felt. It’s nice when the front and back are different colors but of course they don’t have to be.


 Just like any project some kids will finish fast and others will take every last second you allow them to work. As an extension you can have your students that finish early paint pictures of their final monsters, serving as a still life or “portrait” of their monster. I encourage them to make up the backgrounds and have some fun with these paintings by adding their own unique style to it.
 If you have a good space to display these dolls —er, I mean monsters, when they are finished I really encourage you to do so. The kids will be so proud of their work and the other kids, parents and teachers will truly enjoy looking at the designs the kids came up with!


 We have just 12 minutes of read aloud a day and it’s amazing what they can get done during that time. Aside from that, students love getting their work done early so they can help out with the poster and earn extra poster pieces. Even with a class made up almost entirely of boys, the art is a hit!
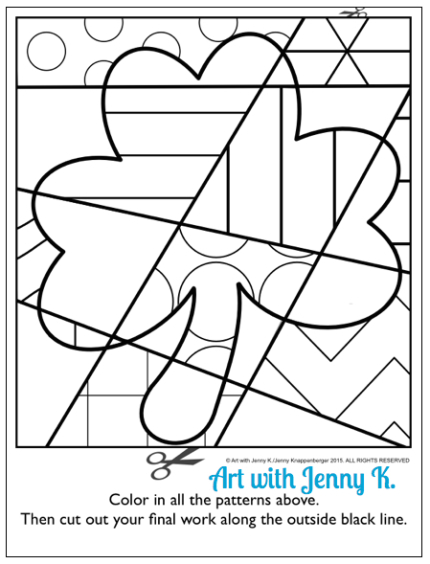
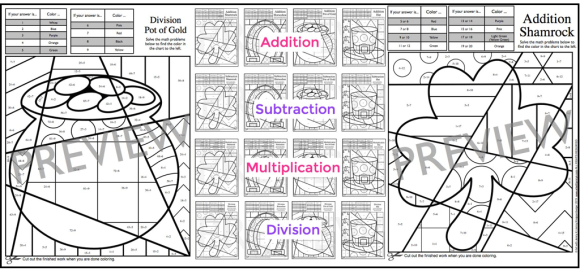
 My goal with any resource I create is to make your life as a teacher easier and to make learning fun for kids. Check out all my St. Patrick’s Day resources


 In this lesson I provide kids with a step-by-step sheet for drawing and painting the leprechaun to include teaching students about tints and shades.

 Since the kids can’t keep the finished poster I always like to give them a coloring sheet as a sample. It is free in my Teachers pay Teachers store by clicking


 I’ll start you down the fun rabbit hole with my resource from these books… (but it’s only JUST the beginning).


 Last summer I was at the Teachers Pay Teachers conference in Vegas and I met a really nice lady named Molly, the teacher-author of
  So, for my March “Featured Teacher” post, I asked Kathleen to share some pictures of her kids using some of my resources in the classroom and to write up a little something from the perspective of a classroom teacher who really integrates art into her curriculum….It’s because of teachers like Kathleen that I love creating resources for my TPT store! Kathleen was born and raised in the San Francisco Bay Area. She has been teaching 5th grade for 16 years and loves teaching math and social studies as well as hanging out with my family and reading in my free time.


 The best part is that there are step by step directions with great details that I can put on the smart board for them to reference throughout the activity. The final display is breathtaking!
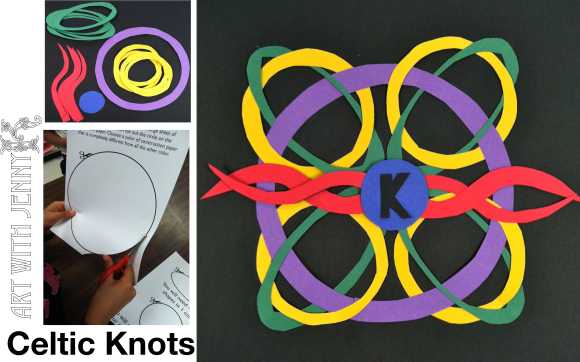
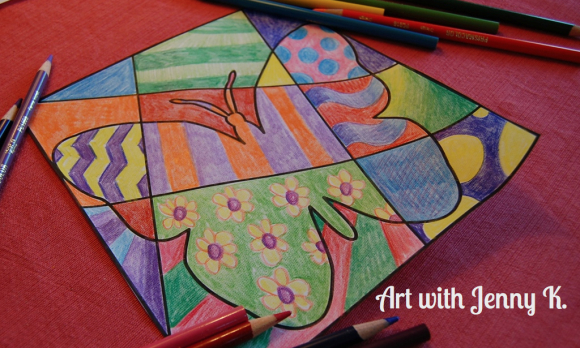
 I’ve found that students love coloring and drawing Celtic knot designs. Of course I have many theories about “why” that is…but regardless of the reasons I’ve seen it enough times to know they enjoy it. They seem like calming designs and they are so intricate that kids have to figure out how they work–they love that. I decided to use this to my benefit to engage students in an art project using the initial of their last name and these Celtic knot designs. I think you’ll agree the finished results are amazing! This would be great for any teacher of grades 3 and above…middle school kids would also LOVE this project!

 If you are using watercolor paints like I recommend, then it’s very important that you have the kids outline with permanent marker or else any water-soluble marker will run when the kids start to paint and use water. However, if you are using tempera or acrylic (which would be fine for older students) then any marker would work fine. Let me show you some of the work the kids did!
 Kids will spend weeks working on the details if you let them!


 A year ago I was designing my


 I went around (non-stop) with bottles of paint squirting colors on the papers. I started with yellow, then blue, then white (to make lighter shades of green), then a very bright green (already mixed) and last some glittery green paint. When I add new colors to their paper I can control how much they get, for example you need more yellow then blue to get a nice green. Also if kids are working in just one area on their paper I’ll put the new color off in a white area so they have to go get it and mix it in. This really helps to get them to cover as much of the paper as possible.


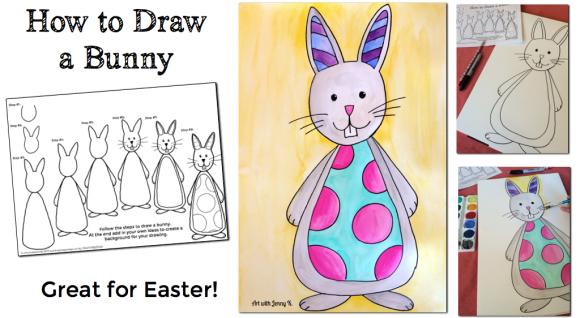 Just in time for Easter…here is a fun and easy handout you can use with your kids to step them though drawing a cute, contemporary (polka dots and stripes are contemporary, right?!) bunny rabbit! I have included a handout you can print for them as well as the steps broken down in pictures and I’ve also included a short video you can use to either learn the steps yourself, or show to your students and let them learn from the video. Thank you for making art with your kids! I hope this will be helpful to you. For my many other
  You will need: Pencil, eraser, permanent marker, “how to draw a rabbit”handout, 12″ x 18″ watercolor paper, watercolor paints, brush and water.


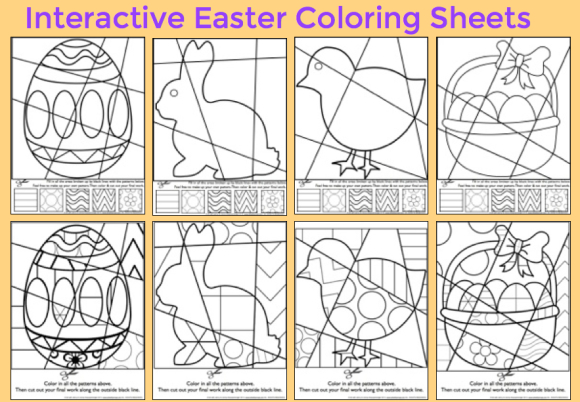
 I love making time lapse videos. I’ve made them for a long time and now I have one for my Easter interactive coloring sheets. In this video you will see how I color in my sheets by adding patterns and designs. The “real” time on this video is about 40 minutes. However, you will see it colored in under 40 seconds!


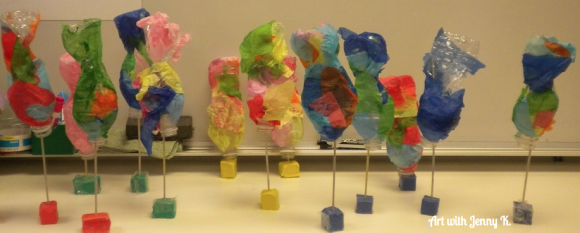 5. When the bottles are dry, students cut out fins from crafting foam using a template I made (just think of it like a triangle with a point missing). I used the hot glue gun and added the eyes and fins because regular glue won’t hold the fins on very well. You could however, always use construction paper, in which case regular glue might hold. The kids painted more glue along the opening and at the back of the fish and then dipped that in glitter. Of course, if the idea of glitter in your classroom makes you want to run and hide, don’t mention that part to your kids!!!
 Here are some of the finished fish!
 If you are interested in the textured paper the fish are sitting on, you can see how we do that in my Hungry Caterpillar post


